More and more (payware) airport scenery packages contain multiple folders. In the X-Plane forum there is often some confusion whether to place these folders together in the scenery_packs.ini or not. Often the names of the folders (numbered or marked ABC) suggest placing them together. So, what should you do?
In this article I will try to explain when placing them together is a good idea and when it is not (and why).
As you will see this articles focuses on ground textures. Why other folders in the airport package are normally not a problem is explained here.
Before I start I cannot stress enough: please read and follow the installation instructions of the developer. You may expect that he/she knows best where to place the package in the scenery_packs.ini order.
X-Plane mesh
First we need to understand what mesh is: mesh is essentially a 3-d model of a section of the earth, consisting of textured triangles. In simple words: it is the ground you see in X-Plane.
Mesh can be the default mesh, but also HD Mesh made by AlpilotX. Orthophotos made with Ortho4xp are also mesh, but with satellite images as textures.
X-Plane Mesh is defined in DSF files, as terrain definitions (TER) and always contain a whole 1×1 degree tile. A smaller area is not possible: mesh for an island surrounded by sea will still be a whole tile.
What is important to understand is that X-Plane will only load mesh for a certain 1×1 degree tile from 1 DSF file. This will be the DSF with the highest priority in the order defined by the scenery_packs.ini file.
Furthermore: mesh overwrites any other type of DSF definitions below it (objects OBJ, polygons POL and networks NET).
What does this mean:
- Any mesh defined in DSF files lower in the order will NOT be loaded (no mixing)
- Any scenery (OBJ, POL and NET) defined in DSF files lower in the order will NOT be visible
More information can be found here: Technical sources and links
Airport orthos and mesh
As explained above it is not possible to ‘cut out’ a part of a mesh (it is always a whole 1×1 degree tile). What developers often do, is use polygons (POL in the DSF file), to ‘paint’ the ground with satellite images (some call them DrapedOrthos). And as you can precisely define an area these polygons will only cover the airport and a part of the surroundings -> so not a whole 1×1 degree tile.
Using polygons like this may seems the optimal solution. Unfortunately the impact on performance is too big to use them for larger areas.
So why is all this important? What you need to know (if the installation instructions don’t tell you what to do) is, if the package contains real mesh (TER definitions) or polygons (POL definitions) for the ground:
- Polygons can be placed next to the airport without any problem
- Real mesh should be placed lower in the scenery_packs.ini order or it will overwrite anything below it
Explained with images see here: Illustrated explanation.
Actual screenshots from X-Plane: Screenshots
Unfortunately with Airport packages all kinds of names are used for ‘the ground’ of the scenery: Overlay, Mesh, DrapedOrthos, Ortho. So what is what?
In xOrganizer you can check the contents of a package with the summary function (right click or F7):
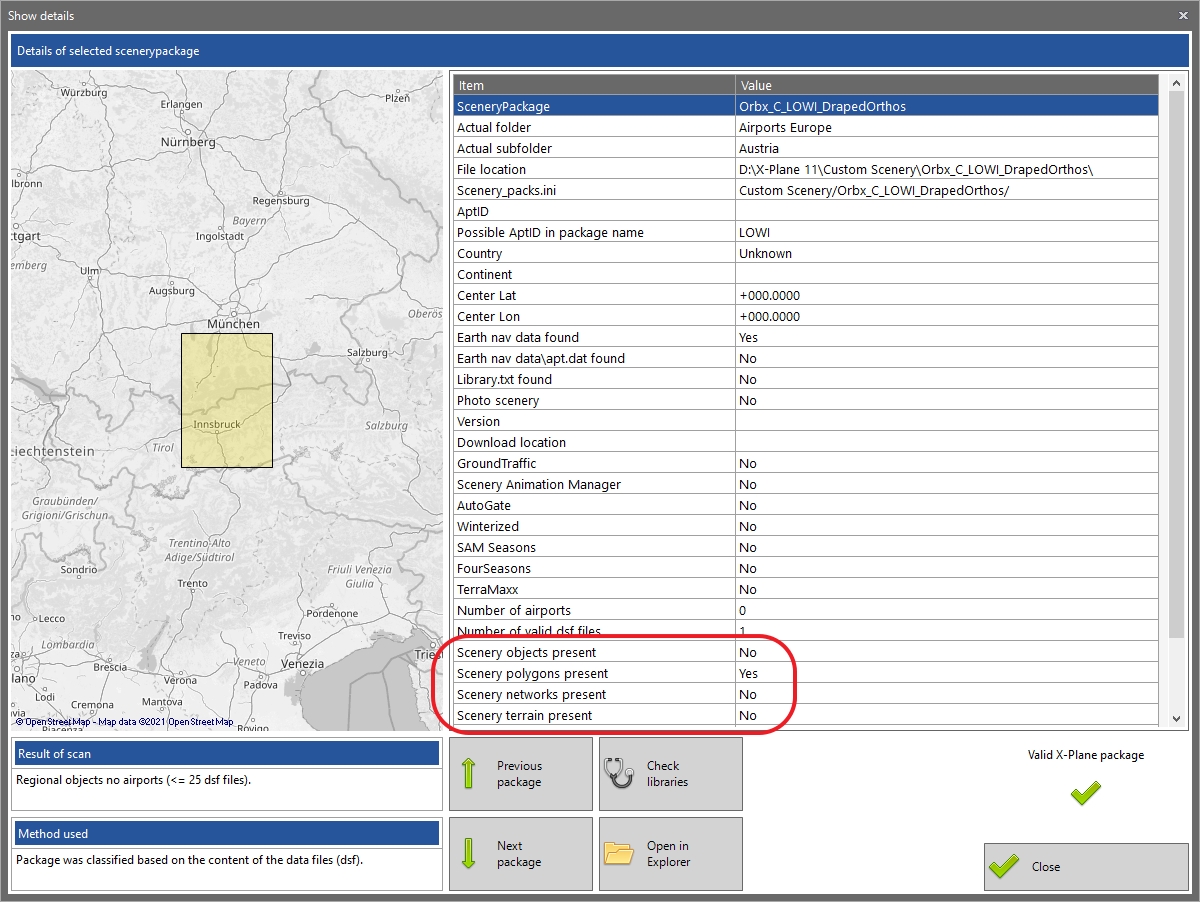
This package only contains polygons (POL), here named DrapedOrthos and can safely be placed next to the airport package, high in the ini order *.
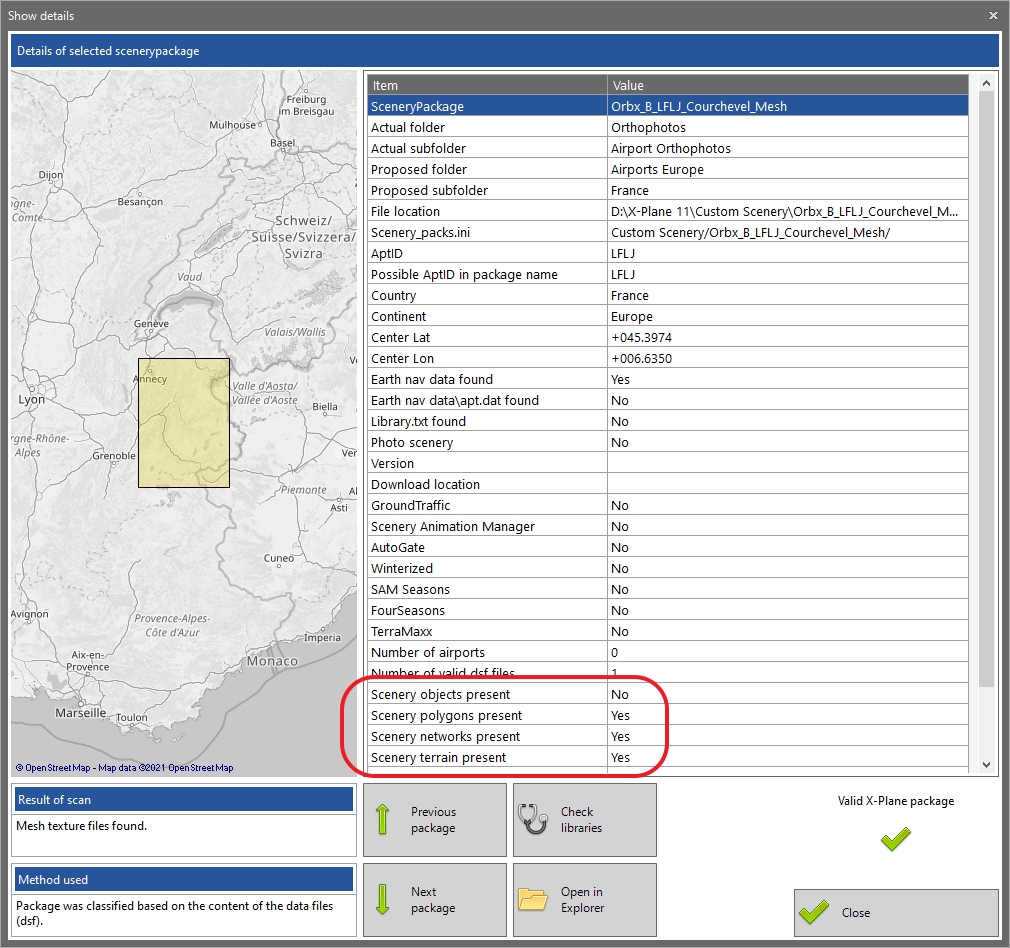
As you can the package above contains terrain definitions (TER) and should therefore be placed lower in the ini order *.
(*) both examples are packages from Orbx (shown with their kind permission) -> Orbx Central (their installer) of course takes the difference between polygons and mesh into account!
Cases where it may not matter
In some cases placing the package with mesh high in the order is no problem:
- The package includes the whole 1×1 degree tile (buildings, forests, etc.) and you don’t need other scenery
- There is no other scenery in that tile: for instance a remote area
- You don’t care 🙂